Suretek AutoPilot Documentation
Everything you need to get your business running on autopilot. Set up in under 2 minutes, no IT department required.
Quick Start
Suretek AutoPilot lets you automate repetitive tasks — reports, file moves, reminders, data syncs — and run them on your schedule, directly on your own network. Here's how to get up and running:
Create your account
Sign up at scheduler.suretek.online/signup. Your private scheduler environment is created instantly.
Verify your email
Check your inbox for a verification link and click it to activate your account.
Install Python on your machine
The Suretek Agent requires Python. See Install Python below.
Download and run the agent
In your dashboard go to Settings and click Download agent.py. Run it and the setup wizard launches automatically. See Install the Agent below.
Create your first job
From your dashboard, click + New Job, enter your command, set your schedule, and save. Your job will run automatically on time, every time.
New accounts come with a free plan — 5 jobs, 1 agent, 500 executions/month. No credit card required.
Install Python
The Suretek Agent is a Python script, so Python must be installed on any machine where you want to run the agent. This is a one-time setup step.
Windows
Go to python.org/downloads
Visit python.org/downloads and click the big yellow Download Python button — this gives you the latest 64-bit Windows installer.
Run the installer
Open the downloaded .exe file. On the first screen, make sure to check "Add Python to PATH" before clicking Install. This is critical — without it the agent won't run from the terminal.
Verify the installation
Open Command Prompt and run:
python --versionYou should see something like Python 3.12.x. If you see an error, restart your computer and try again.
Linux
Python is usually pre-installed on Linux. Verify with:
python3 --versionIf it's not installed:
sudo apt install python3   # Ubuntu/Debian
sudo yum install python3 # CentOS/RHELSuretek Agent requires Python 3.8 or later. We recommend always installing the latest version from python.org.
Install the Agent
The Suretek Agent is a lightweight Python script that runs on your local machine. It connects outbound to your scheduler dashboard — your data never leaves your network.
Download the agent
Go to Settings in your dashboard
Log into your Suretek dashboard and click Settings in the top navigation.
Click "Download agent.py"
Scroll to the Agent section and click the ↓ Download agent.py button. Save the file somewhere easy to find, like your Desktop or a Suretek folder.
Open a terminal in that folder
Windows: Open Command Prompt, then navigate to where you saved the file:
cd C:\Users\YourName\Desktop
Linux: Open a terminal and navigate to the file location.
Run the agent
Windows: python agent.py
Linux: python3 agent.py
The setup wizard launches automatically on first run.
Complete the setup wizard
The wizard asks for your dashboard URL (e.g. https://yourname.app.suretek.online) and your API key — a unique code that connects your agent to your account. Find it in Settings → Agent → API Key. The wizard tests the connection and confirms everything is working.
Confirm connection
In your dashboard, go to Settings → Agent. Your agent should appear as Online within 30 seconds.
Useful agent commands
| Command | What it does |
|---|---|
python agent.py | Starts the agent (runs setup wizard on first launch) |
python agent.py ping | Tests the connection to your dashboard with detailed error messages |
python agent.py fix | Fetches your API key directly from the server — no copy/paste needed |
python agent.py diagnose | Compares your local key with the server key and finds mismatches |
Running as a background service
To keep the agent running automatically after a reboot — no terminal window needed — install it as a background service.
Windows — Option 1: NSSM (Recommended)
NSSM (Non-Sucking Service Manager) installs the agent as a proper Windows Service that starts at boot, survives logoffs, and auto-restarts if it crashes.
Download NSSM
Go to nssm.cc/download and download the latest version. Extract it and copy nssm.exe to C:\Windows\System32\ so it's available system-wide.
Run the install command
Open Command Prompt as Administrator and run:
python agent.py install-serviceThis automatically installs and starts the SuretekAgent Windows Service.
Confirm it's running
Open services.msc from the Start menu and look for Suretek Job Agent — it should show as Running. You can start, stop, or restart it from there at any time.
Windows — Option 2: Task Scheduler (No extra tools)
If you'd rather not install NSSM, run this command for step-by-step Task Scheduler instructions:
python agent.py task-schedulerOr follow these steps manually:
- Open Task Scheduler from the Start menu
- Click Create Basic Task — Name it "Suretek Agent"
- Trigger: When the computer starts
- Action: Start a program
Program:pythonArguments:C:\path\to\agent.py - In Properties → General: check Run whether user is logged on or not and Run with highest privileges
Linux — systemd
sudo nano /etc/systemd/system/suretek-agent.service

[Unit]
Description=Suretek Agent
After=network.target

[Service]
ExecStart=/usr/bin/python3 /home/youruser/agent.py
Restart=always
User=youruser

[Install]
WantedBy=multi-user.target
sudo systemctl enable --now suretek-agentThe agent only makes outbound HTTPS connections to your dashboard. No firewall rules or inbound ports need to be opened.
Your First Job
A job is any command or script you want to run automatically. It can be a Python script, a batch file, a shell script, or any program your machine can run from a terminal.
Click "+ New Job" in your dashboard
From the Jobs page, click the + New Job button in the top right.
Name your job
Give it a clear name like "Daily Sales Report" or "Nightly Database Backup".
Enter the command
Enter the command exactly as you'd type it in a terminal:
python C:\scripts\daily_report.py
bash /home/user/scripts/backup.shSet the schedule
Choose when to run the job. See Schedules for all options.
Select your agent
Choose which local agent should run this job. If you only have one agent it's selected automatically.
Save and go
Click Save Job. Your job is now active and will run on its next scheduled time.
→ Jobs
A job is any command or script you want to run automatically. Suretek supports any executable that can run from a command line.
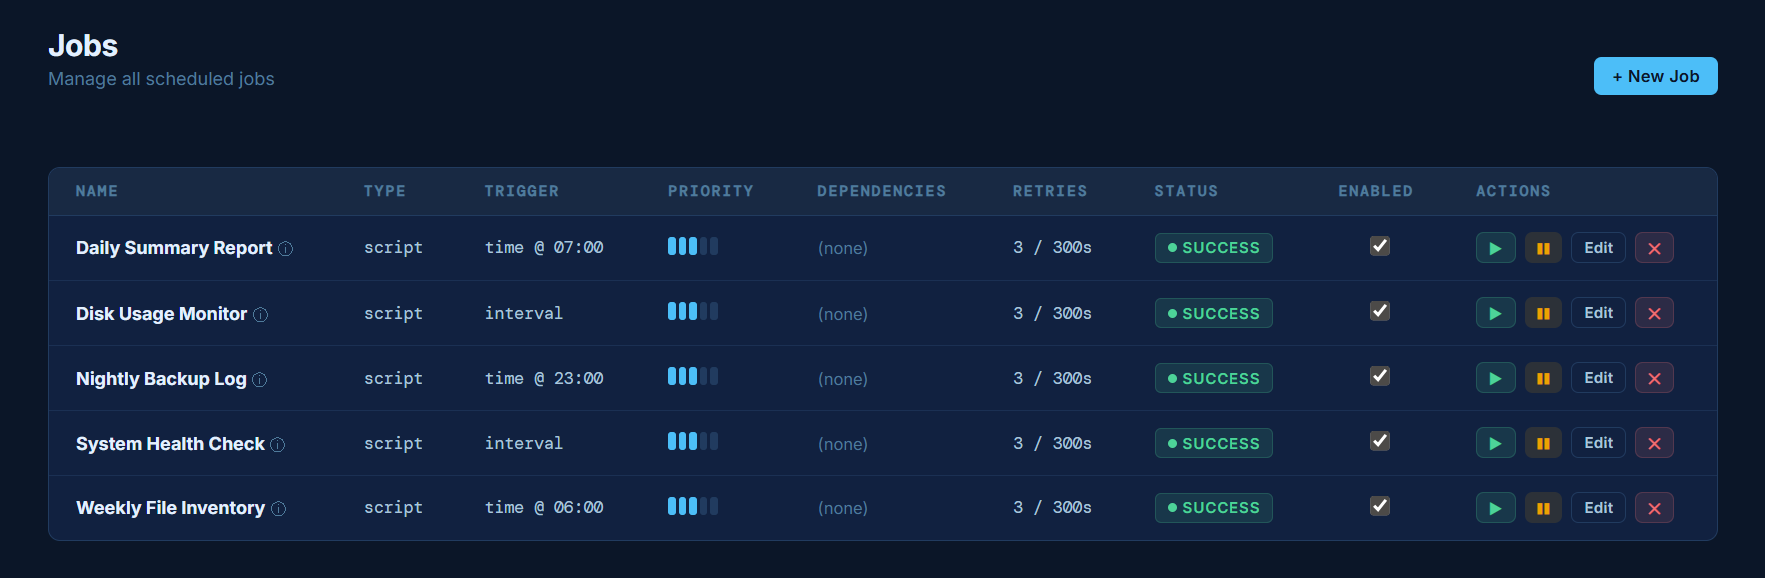
Job actions
Each job in the Jobs table has four action buttons:
| Button | What it does |
|---|---|
| ▶ Run | Triggers the job immediately outside its normal schedule |
| ❚❚ Pause | Temporarily stops the job from running. The job stays configured and resumes with one click. Use this for maintenance or holidays. |
| ▶ Resume | Resumes a paused job — it will run again on its next scheduled time |
| Edit | Opens the job editor to change the command, schedule, or settings |
| ✕ Delete | Permanently deletes the job |
Execution modes
When creating a job you can choose how it runs:
- Agent — the job runs on your local machine via the Suretek Agent. Use this for tasks that need access to your local network, files, databases, or internal systems.
- Server — the job runs directly on the Suretek hosted server. Use this for lightweight cloud tasks like sending emails, connecting to an online service, or generating a report that doesn't need local data.
Most small business customers will use Agent mode. Server mode is a powerful option for tasks that don't require access to your local network.
Viewing job output logs
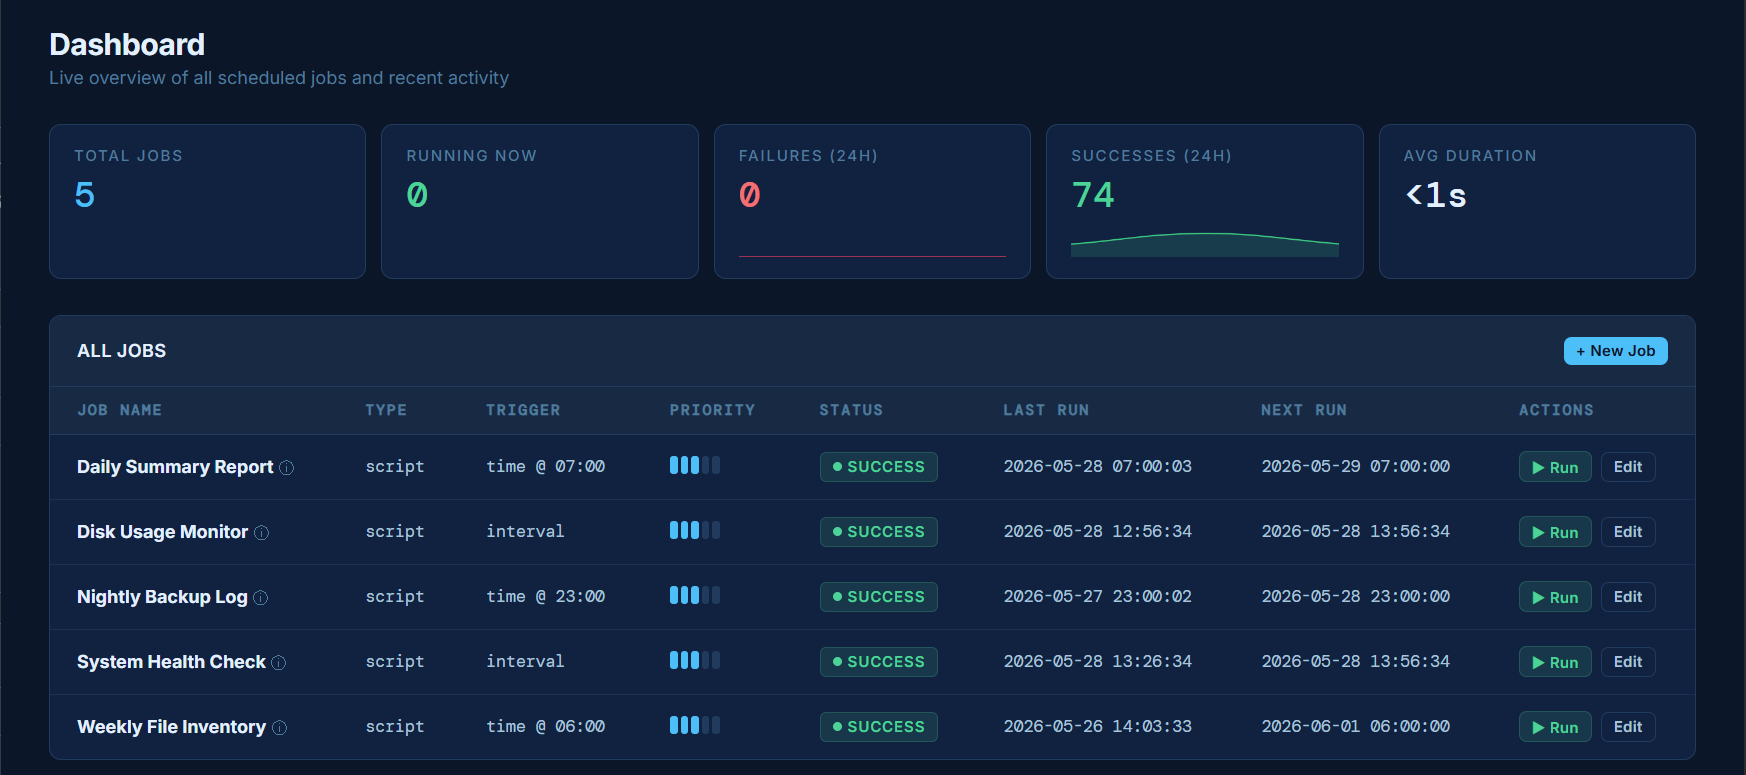
Every time a job runs, Suretek captures its full output — everything the script printed to the screen. To view it, go to your Dashboard and look at the Recent Activity table. Any run that produced output will show a → Log button in the Log column.
Click it and a new tab opens showing the complete output from that run — including any error messages — in a clean terminal-style view. This is the fastest way to diagnose why a job failed.
If a job shows SUCCESS but didn't produce the expected file or result, click → Log to see exactly what the script did — the output often reveals the real issue.
Force clearing a stuck job
Occasionally a job may get stuck showing a Running status — usually because the agent lost connection while a job was executing and never reported back. When this happens the job won't run again until it's cleared.
To fix it immediately, click the ⚠ Clear button that appears in the Actions column whenever a job is stuck in Running. This instantly resets the job to Idle so it can run again on its next scheduled time.
The ⚠ Clear button only appears when a job is stuck in Running status. Stuck jobs are also cleared automatically by the system after 30 minutes.
Pause vs Disable
There are two ways to stop a job from running:
- Pause — temporary. Use the ❚❚ Pause button when you need to stop a job briefly. It stays fully configured and is easy to resume. Great for maintenance windows or holidays.
- Disable — indefinite. Use the checkbox in the Enabled column to disable a job you don't need running for the foreseeable future.
Job types
Python Scripts
Run any .py file — data exports, reports, API calls, email notifications.
Shell / Batch Scripts
.sh files on Linux, .bat or .ps1 files on Windows.
Executables
Any program or tool your machine can run from a terminal.
System Commands
Disk cleanup, file moves, backups, database exports.
Make sure Python and any libraries your script uses are installed on the machine running the agent. For example, if your script uses pandas or requests, run pip install pandas requests on that machine before scheduling it. The agent runs your scripts with the same Windows or Linux user account it was started under, so it only has access to what that user can access.
→ Workflow Templates
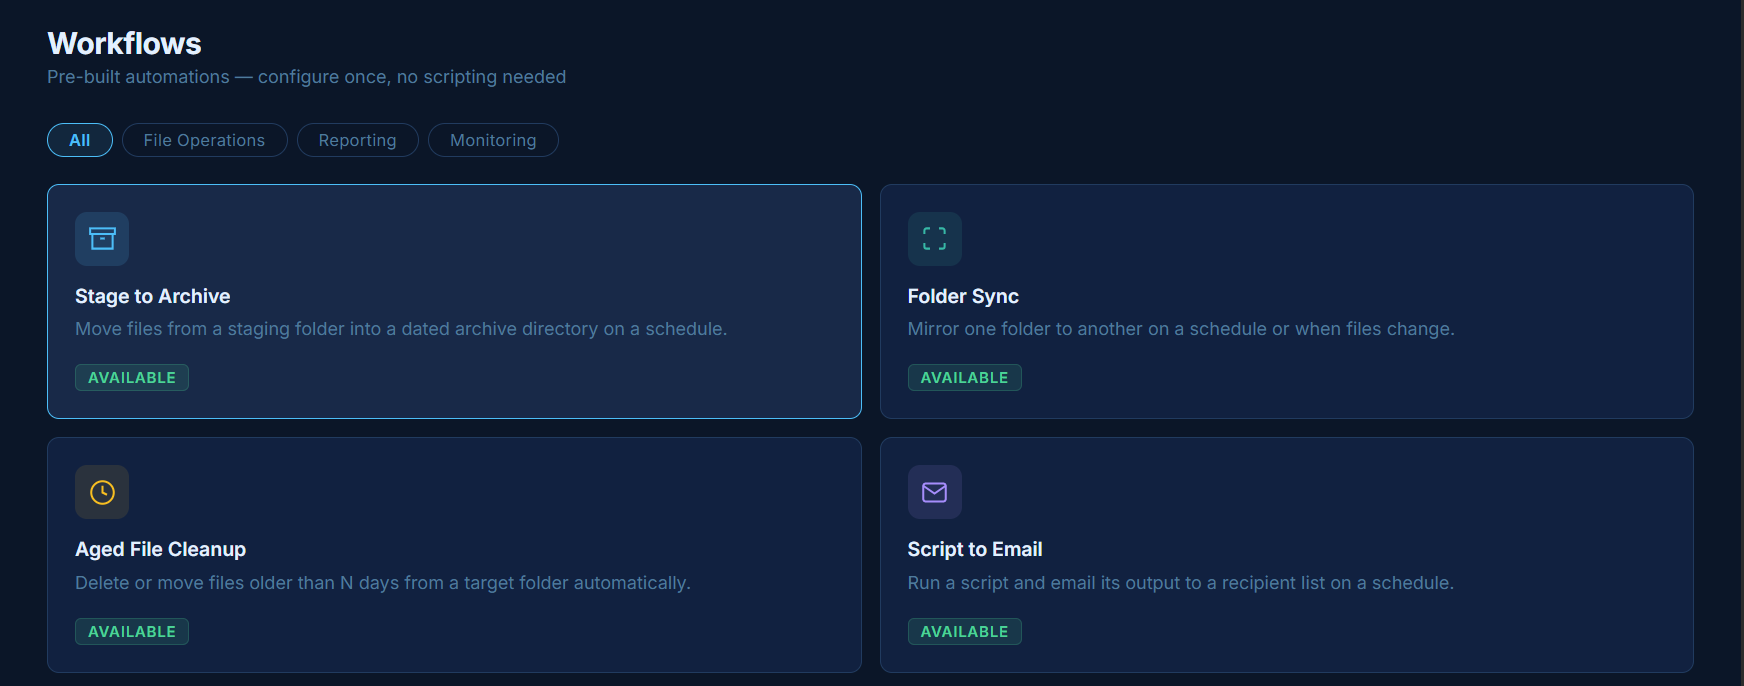
Workflows are pre-built automations you can configure and deploy in seconds — no scripting required. Each template handles a common business task and generates a fully configured job in your scheduler automatically.
To access workflows, click Workflows in the left navigation. Select a template, fill in the fields, and click Create Workflow. Your job will appear in the Jobs table and run on its next scheduled time.
Stage to Archive
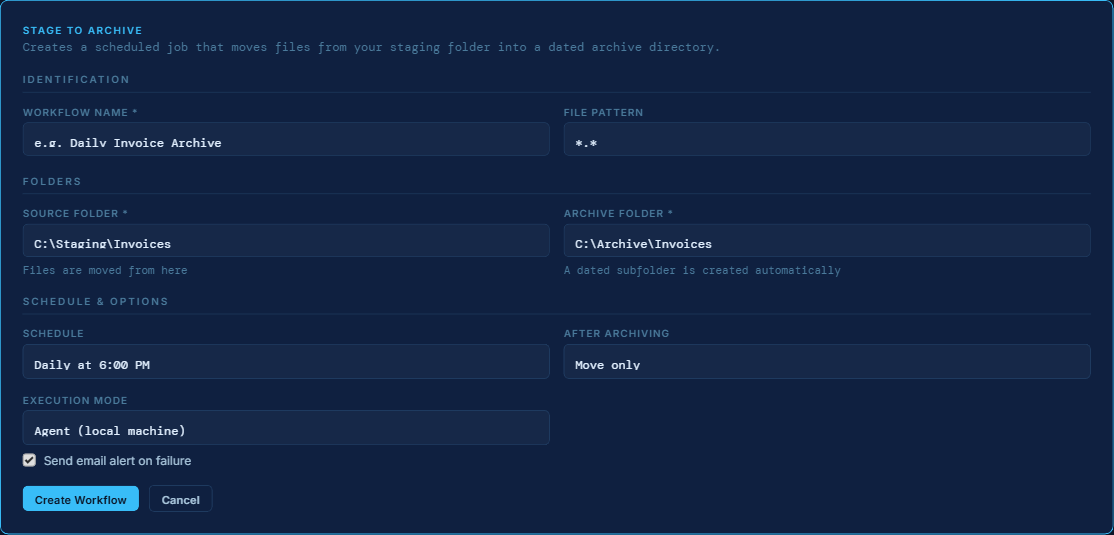
Moves files from a staging folder into a dated archive directory on a schedule. A new subfolder is created automatically for each run so files are always organized by date without any manual effort.
Common use cases: archiving processed invoices, moving completed orders out of a work queue, rotating nightly exports into long-term storage.
| Field | Description |
|---|---|
| Workflow Name | A label for this automation, e.g. Daily Invoice Archive. |
| File Pattern | Filters which files to move. Use *.pdf for PDFs only, *.* for everything. Leave blank to match all files. |
| Source Folder | The staging folder where files accumulate, e.g. C:\Staging\Invoices. |
| Archive Folder | The root destination. A dated subfolder is created here automatically on each run. |
| Schedule | Daily at 6:00 PM, Daily at midnight, Every hour, or Manual only. |
| After Archiving | Move only — files are moved as-is. Zip + delete originals — files are compressed into a zip and the originals are removed. |
| Execution Mode | Use Agent for local folders on your machine. Server for cloud-accessible paths. |
Folder Sync
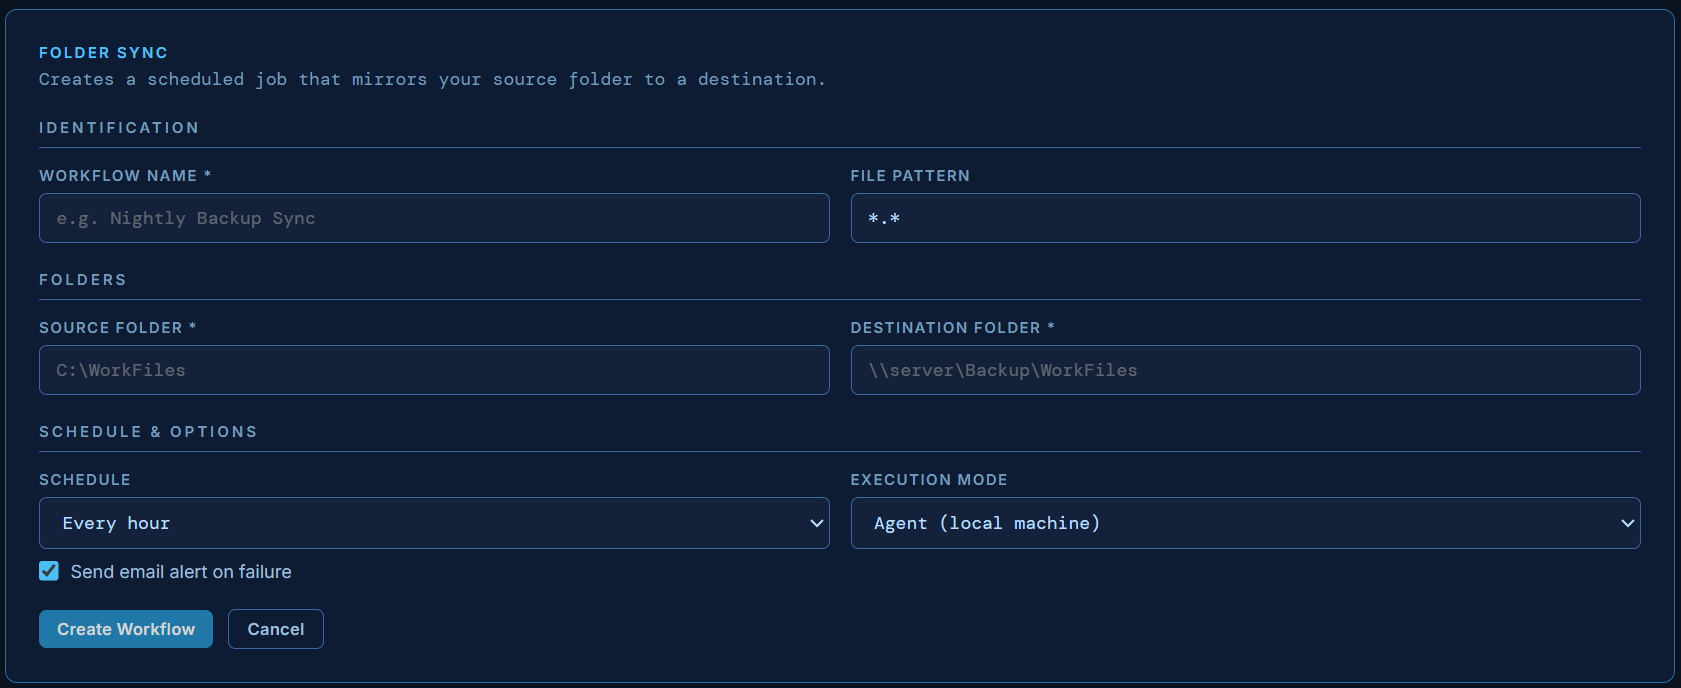
Copies new and updated files from a source folder to a destination on a schedule. Use this to keep a backup drive, network share, or secondary machine in sync automatically.
Common use cases: syncing a work folder to a NAS (network-attached storage drive) or external drive, mirroring files to a backup location, keeping a laptop and desktop in sync.
| Field | Description |
|---|---|
| Workflow Name | A label for this automation, e.g. Nightly Backup Sync. |
| File Pattern | Filters which files to sync. Use *.* to sync everything. |
| Source Folder | The folder to sync from, e.g. C:\WorkFiles. |
| Destination Folder | Where files are copied to, e.g. \\server\Backup\WorkFiles. |
| Schedule | Every hour, Every 30 minutes, Daily at midnight, or Manual only. |
| Execution Mode | Use Agent for local or network paths. |
Aged File Cleanup
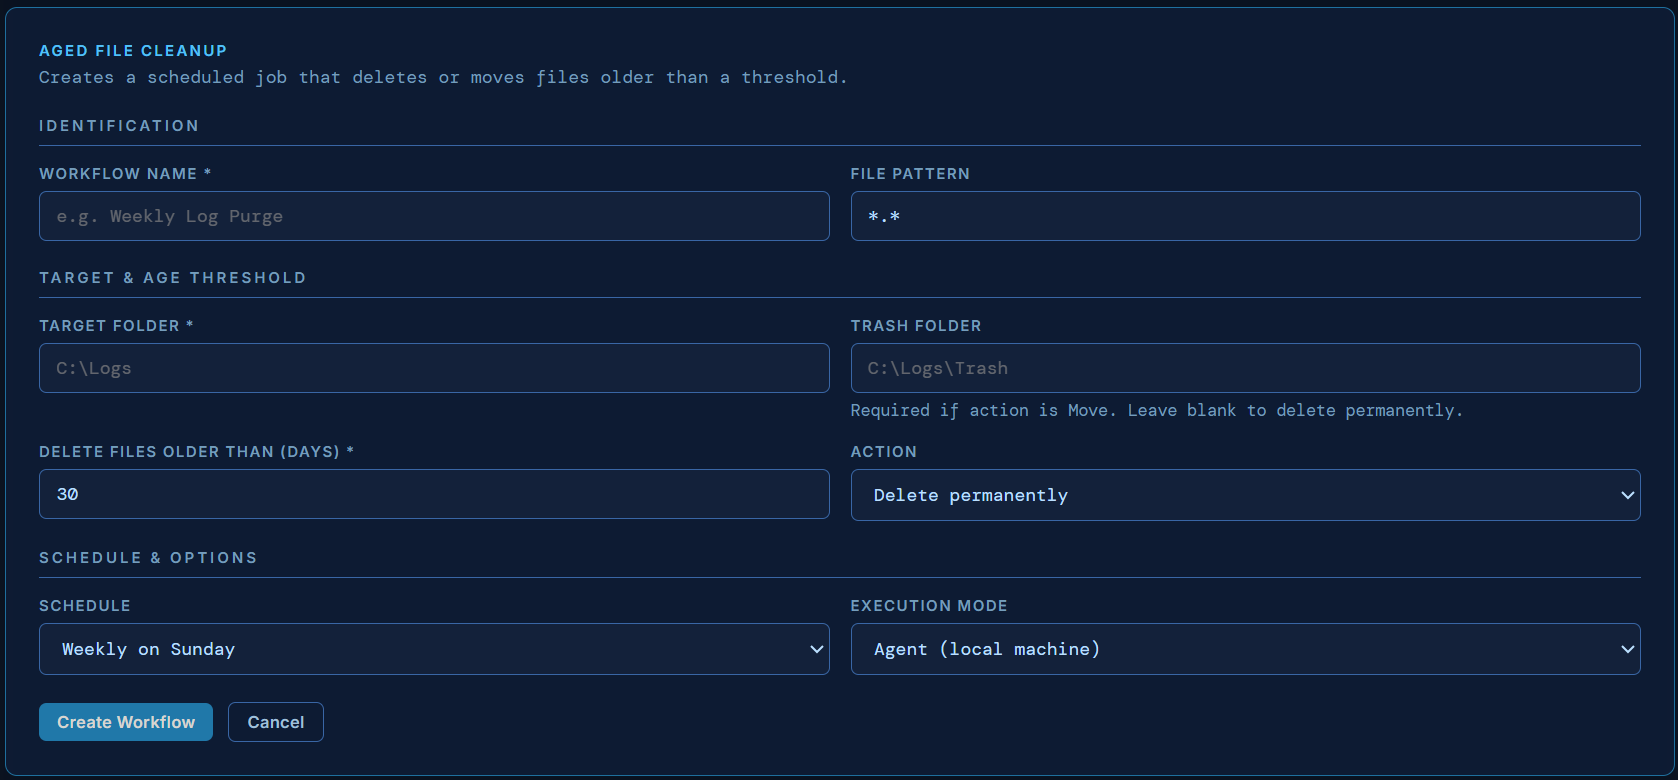
Automatically removes or moves files older than a set number of days from a target folder on a schedule.
Common use cases: purging temp files or old exports, clearing a downloads folder of files older than 90 days, rotating log files before a drive fills up.
| Field | Description |
|---|---|
| Workflow Name | A label for this automation, e.g. Weekly Temp File Cleanup. |
| File Pattern | Filters which files to evaluate. Use *.log for log files only, *.* for everything. |
| Target Folder | The folder to scan for aged files. |
| Trash Folder | Optional. Only used when Action is set to Move to trash folder. |
| Delete Files Older Than (days) | Any file with a last-modified date older than this threshold will be acted on. |
| Action | Delete permanently — files are removed immediately. Move to trash folder — files are relocated instead of deleted. |
| Schedule | Weekly on Sunday, Daily at midnight, or Manual only. |
| Execution Mode | Use Agent for local folders. |
Script to Email
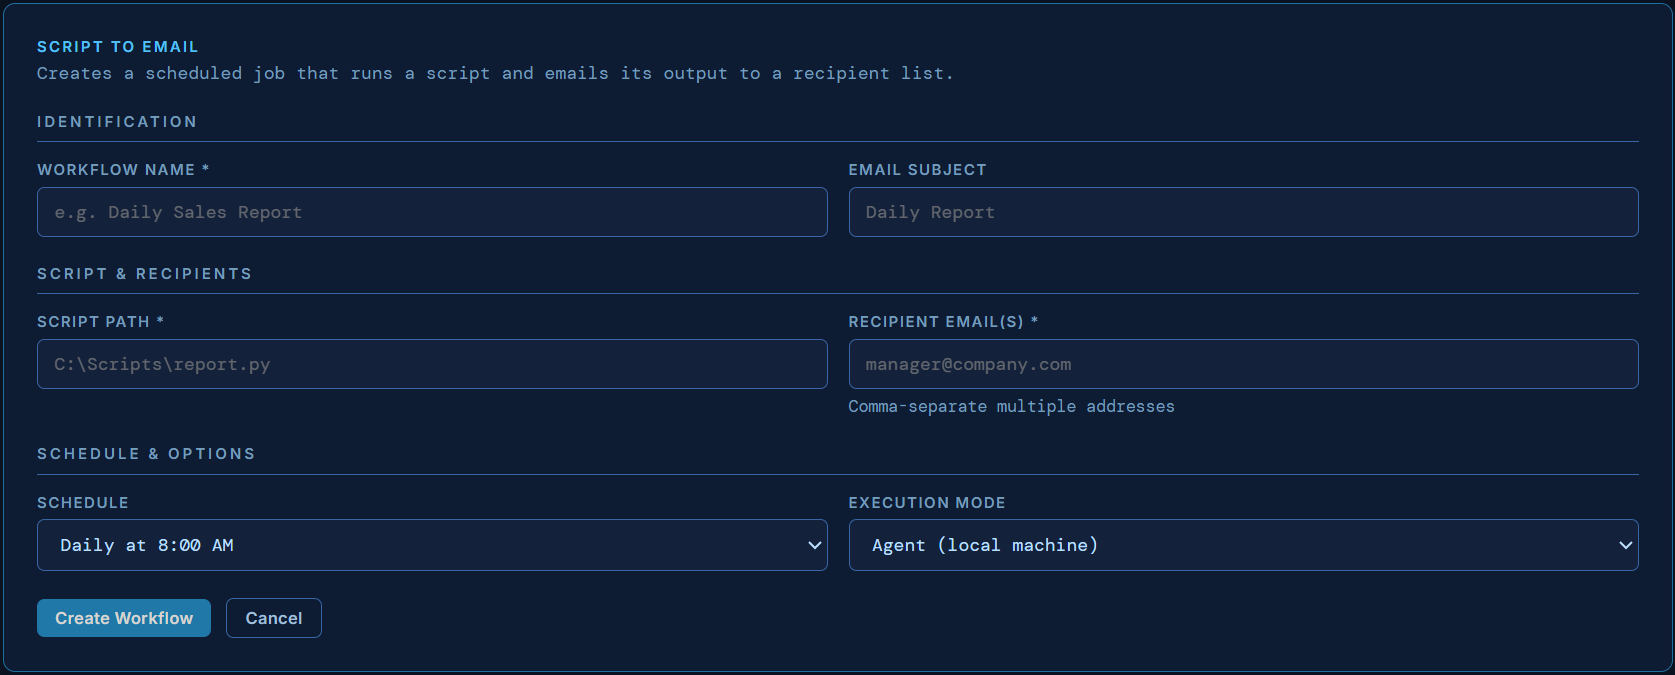
Runs any script on a schedule and emails the full console output to one or more recipients. No custom email code required — point it at your script and Suretek handles the delivery.
Common use cases: emailing a daily sales summary, sending a nightly error report, delivering a weekly inventory count to your team.
| Field | Description |
|---|---|
| Workflow Name | A label for this automation, e.g. Daily Sales Report. |
| Email Subject | The subject line of the email sent to recipients. |
| Script Path | Full path to the script, e.g. C:\Scripts\daily_report.py. |
| Recipient Email(s) | One or more addresses to send output to. Separate multiple with a comma. |
| Schedule | Daily at 8:00 AM, Daily at 6:00 PM, Weekly on Monday, or Manual only. |
| Execution Mode | Use Agent for scripts that access local data. Server for scripts that only call external APIs. |
Coming Soon
Two additional templates are in development:
- Database Backup — Schedule automatic backups of SQLite databases to a local or network path.
- Service Monitor — Watch a Windows service and auto-restart it if it stops, then send an alert.
→ Schedules
Suretek supports flexible scheduling so you can run jobs exactly when you need them.
| Type | Example | Use Case |
|---|---|---|
| Every N minutes | Every 15 minutes | Polling, sync checks |
| Hourly | At :30 past each hour | Lightweight reporting |
| Daily | Every day at 6:00 AM | Morning reports, daily exports |
| Weekly | Every Monday at 8:00 AM | Weekly summaries |
| Monthly | 1st of month at midnight | Monthly billing exports |
| Custom (Cron) | 0 9 * * 1-5 | Weekdays only, specific times |
Cron syntax (advanced)
# minute hour day month weekday
0 9 * * 1-5   # Weekdays at 9:00 AM
0 */4 * * *   # Every 4 hours
30 8 1 * *    # 1st of each month at 8:30 AM
0 0 * * 0     # Every Sunday at midnight
Time zones
Schedules run in the time zone configured in Settings → Time Zone. All execution logs display times in your configured time zone.
→ Agents
An agent is the software running on your local machine that executes your jobs. Your agent connects outbound to Suretek — your data stays inside your network.
How agents work
The agent checks in with your dashboard every few seconds, picks up any jobs that are due, executes them locally, and sends the result back. You always see what happened, even for jobs that ran overnight.
The agent initiates all connections — your Suretek server never reaches into your network. No firewall rules or port forwarding required.
What to do if your agent goes offline
If your agent stops polling the server, your jobs will stop running. You'll receive an email alert within 30 minutes. Here's how to get back online:
Check if the agent is running
Look for the terminal or PowerShell window where you started the agent. If it closed, reopen it and run python agent.py.
Test the connection
Run python agent.py ping — this tests the connection and shows a clear error message if something is wrong.
Diagnose key issues
Run python agent.py diagnose — this compares your local API key with the one on the server and fixes mismatches automatically.
If installed as a Windows Service
Open services.msc from the Start menu, find Suretek Job Agent, and click Restart.
Last resort — fresh setup
Go to Settings → Download agent.py, save it, and run python agent.py setup to reconfigure from scratch.
If the agent is offline, jobs that were due to run will be marked as Skipped in your run history. They will resume automatically on their next scheduled time once the agent is back online.
Agent status
| Status | Meaning | Action |
|---|---|---|
| Online | Agent is running and connected | None needed |
| Offline | Agent hasn't checked in recently | Check that the agent process is running on the local machine |
| Error | Agent is reporting errors | Run python agent.py diagnose to check for key mismatches |
→ SFTP & File Transfer
AutoPilot can connect to remote SFTP servers to upload and download files on a schedule, or trigger jobs automatically when new files arrive. This is available on the Pro and Business plans.
Connections
Before creating SFTP jobs or poller rules, you need to save at least one SFTP connection. Go to Connections in the top navigation. Each connection stores:
- Host — the SFTP server address (e.g.
sftp.example.com) - Port — default is 22
- Username — your SFTP login
- Auth type — password or private key
- Default remote path — the starting directory on the server
Click Test on any saved connection to verify credentials before using it in a job.
SFTP Transfer Jobs
To upload or download files on a schedule, create a new job and set the type to SFTP Transfer. You will then configure:
- Connection — select a saved SFTP connection
- Direction — Upload (local → remote) or Download (remote → local)
- Local path — the file or folder on the machine running the agent
- Remote path — the destination path on the SFTP server
SFTP Transfer jobs support all standard scheduling options — run on a schedule, at a set time, on an interval, or triggered by another job.
File Arrival Poller Rules Business
Poller Rules let AutoPilot watch a remote SFTP folder and trigger a job automatically when a new file appears. This is useful for workflows like processing payroll files, EDI documents, or bank exports as soon as they are dropped on a server.
To set up a poller rule, go to Connections and scroll to the File Arrival Poller Rules section. Click + Add Rule and configure:
- SFTP Connection — which server to watch
- Remote path — the folder to monitor (e.g.
/uploads) - Filename pattern — filter by name, e.g.
*.csvorpayroll_*.xml - Poll interval — how often to check, in seconds (minimum 10)
- Linked job — the AutoPilot job to trigger when a match is found
- Action on match — run once per poll cycle, or once per new file
- Move file to — optionally move matched files to an archive folder after triggering
- Delete after trigger — optionally delete the file after the job is triggered
Each active poller rule runs as a background service on the server. Rules can be enabled or disabled at any time without deleting them.
Credential security
All SFTP passwords and private keys are encrypted at rest using AES-128 Fernet encryption. Credentials are never stored in plain text and are decrypted only at the moment a connection is used.
→ Executions & Logs
Every time a job runs, Suretek records the result as an execution. You can see the full history of every run — when it ran, how long it took, whether it succeeded, and the full log output.
Execution results
| Result | Meaning |
|---|---|
| Success | Job finished without errors |
| Failed | Job encountered an error or took too long to complete |
| Skipped | Agent was offline when the job was due |
Failure notifications
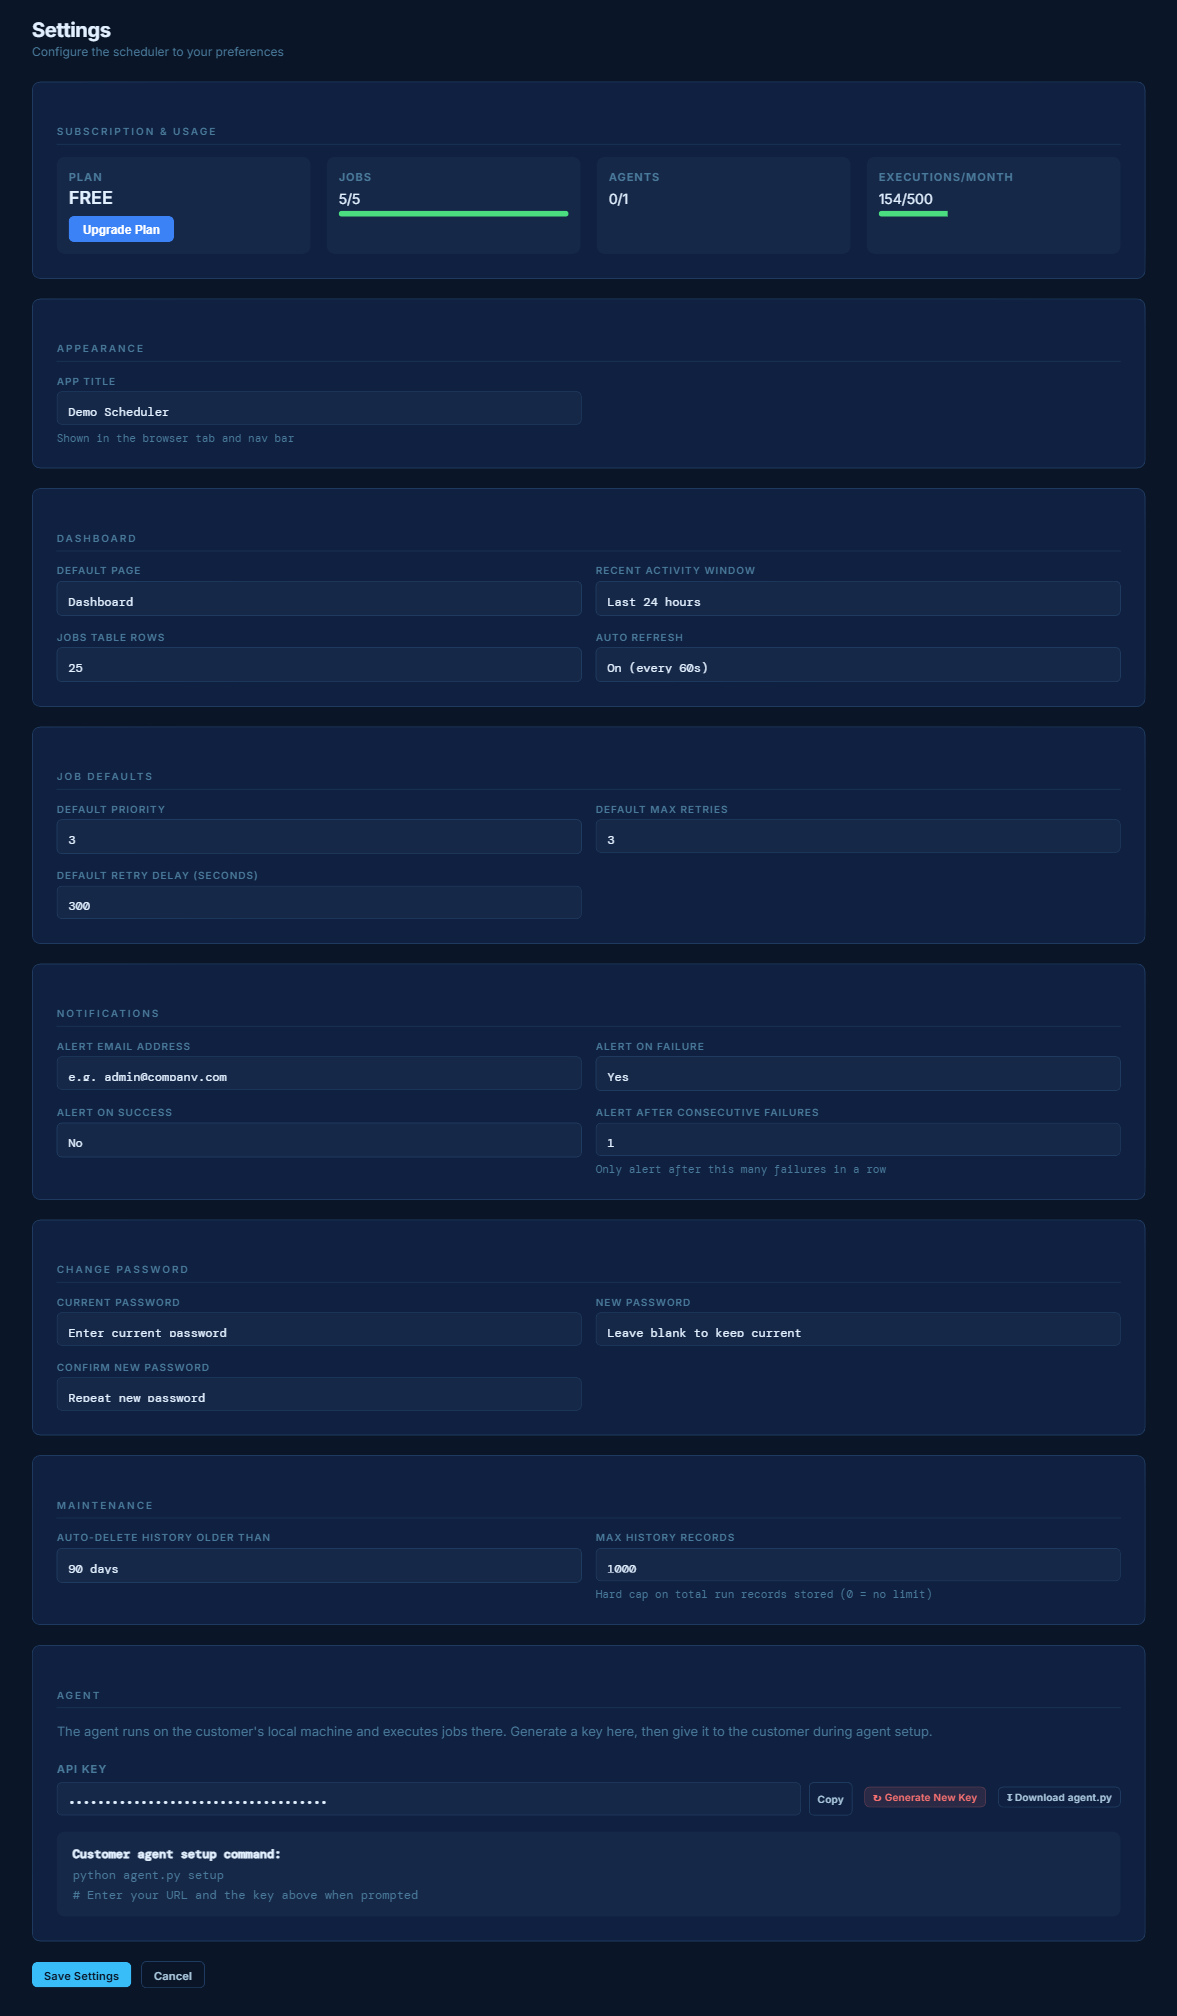
Suretek can email you when a job fails. Go to Settings → Notifications to configure your email address and notification preferences.
Plan Comparison
| Feature | Free | Starter $19/mo | Pro $69/mo | Business $199/mo |
|---|---|---|---|---|
| Scheduled jobs | 5 | 25 | 100 | 500 |
| Local agents | 1 | 2 | 5 | 20 |
| Executions/month | 500 | 10,000 | 100,000 | Unlimited |
| Log retention | 7 days | 30 days | 90 days | 1 year |
| Support | Email (48hr) | Email (24hr) | Priority email | 24/7 phone + Slack |
Limited-time offer: Sign up for any paid plan and get unlimited agents for life.
→ Billing & Payments
How billing works
Paid plans are billed monthly. Your billing date is the day you first subscribed. Payments are processed securely via Stripe — Suretek never stores your card details.
Free trial
All paid plans include a free trial. You won't be charged until the trial ends. Cancel any time during the trial with no charge.
Cancellation
Cancel any time from Settings → Billing. Your account remains active until the end of your billing period, then downgrades to the Free plan. Your jobs and data are preserved.
Upgrading Your Plan
Go to Settings → Billing
Log into your dashboard and navigate to Settings, then click Billing.
Click "Change Plan"
Select the plan you'd like to upgrade to.
Confirm payment
Your new plan takes effect immediately. You're only charged for the days remaining in your current billing period.
Frequently Asked Questions
Step 1 — Check if the agent is still running. Look for the terminal or PowerShell window where you started the agent. If it's closed, reopen it and run
python agent.py.Step 2 — Test the connection. Run
python agent.py ping to check if it can reach your dashboard. If ping fails, check your internet connection.Step 3 — Diagnose key issues. Run
python agent.py diagnose to compare your local API key with the one on the server. A mismatch is the most common cause of agent failures.Step 4 — If installed as a Windows Service. Open services.msc from the Start menu, find Suretek Job Agent, and click Restart.
Step 5 — Last resort. Go to Settings in your dashboard, click Download agent.py, and set it up fresh by running
python agent.py setup.Contact Us
Can't find the answer you're looking for? We're here to help.